
Part 4: Solfege Teaching Guide
Launching a New Class
Start solfege class at the beginning of the month, so that the first three (or four classes) are solfege and the last class of the month is dictation. This chapter addresses the logistics of launching a new class, but not the specific details. Those details come in the chapter titled Foundation - Details.
First Solfege Class
Have an attendance sheet for the first class and any time a new student starts to capture students’ and parents’ full names, and contact information. Pick up where the demo in the previous chapter leaves off.
If none of the students have done solfege before, they will be completely lost, which is normal. A brand new solfege class will be lost for about three classes before things start to click and they begin to catch on.
Assuming solfege classes are 45 minutes long:
1. Very first class - introduce treble clef (also called the G clef), staff (with five lines and four spaces), and the notes. Since exercise one is a simple do major scale, think about The Sound of Music, look at the notes and also refer to the first page of Solfege des Solfeges where the notes are written out: do re mi, etc.
Explain that the C shaped symbol they see is used to denote 4/4 time (also called common time) and learn/review how to conduct 4/4 time.
Students new to conducting time consistently have trouble with the third beat. The third beat should be out to the right, at the 3 o’clock position. Newer students will often skip the third beat and go straight up to the fourth beat and lose track of time. Or their third beat is “lazy” and more down at the 5 o’clock position. Expect this in the beginning, and have them correct this sooner rather than later. That 3 o’clock position is also why folding chairs and stands need to be spaced appropriately so students can execute a third beat properly without hitting the person to their right (or a cabinet or wall).
For very young students:
- If the instructor is facing the class and teaching students how to conduct time, the really young ones will raise the wrong hand. They haven’t figured out spatial orientation yet, so face away from the class and demonstrate that conducting time is done with the right hand.
- Gauge their attention span. They may only be able to handle 15 minutes of solfege initially before they sit in back with a parent. This is also why we start with the youngest group.
Introduce whole notes, and that they have a duration of four beats. Introduce barlines, and that each bar has four beats, and the notes within each bar have to add up to four beats, so now we’re also learning math!
Note the comma symbols - those are breath marks because singers can’t keep singing without taking a breath.
Sing exercise 1 while conducting time. The accompanist plays, and one or two assistants are walking on the floor to ensure students:
- pay attention, focus on the music, and know where they are in the music (point if necessary using a pencil). Students who can’t sightread well often look at the accompanist for reassurance, instead of their music.
- beat time correctly. Assistants/accompanist will need to correct students periodically or say “down” to indicate the first beat
- sing and solfegiate the correct notes
For a brand new class, almost no one will sing, or they’ll sing very quietly. It’s a foreign class, and they’re surrounded by strangers. That won’t last for long. By the third class, even normally shy kids will have bonded and the class will start getting noisy.
Notes for the accompanist:
Here is the accompaniment music for exercise one:
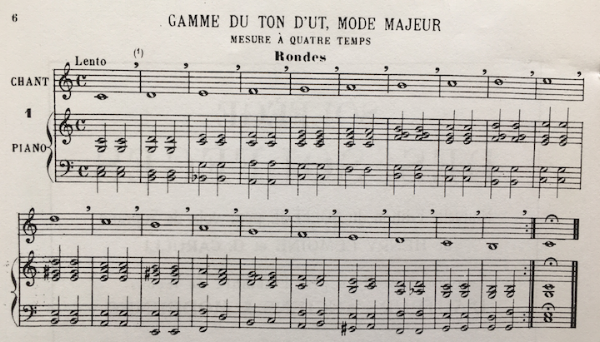
Play accompaniment with the melody as whole notes and the rest of the notes played as repeated quarter notes. Why?
- New students will struggle with singing, solfegiating, and conducting time simultaneously. Having a constant quarter note beat helps students keep better track of time when learning how to conduct 4/4 time. Clearly accent the first beat and remind students when they hear that, move their right fist down (first beat). Call out “down!” if necessary to remind students of the first beat.
- This small change, plus the slow tempo (Lento) of exercise one, turns this exercise into a regal march. And there is no better way to celebrate a new student’s entry into the world of solfege, than with a regally performed exercise 1.
- To start each exercise, play the first chord so students hear the pitch, count 1, 2, ready, go! Then play and have students sing together. For advanced students training for perfect pitch, have them hum the first note they will sing first, then play the first chord. Students will then begin conducting time and sync up.
By the third week, students will understand the structure of solfege class. Have assistants evaluate progress, and if necessary, repeat the first three exercises until students are more comfortable. Laying a solid foundation in the early days is important. The second exercise will throw them off because of the half notes, and the fact that new students tend to have trouble with the third beat. After the first three exercises, jump straight to 11. Exercises 4 - 10 cover the intervals, and rather than go through these, ear training covers learning the intervals. By jumping straight to 11, students immediately begin singing real songs.
From exercise 11 on, establish a blueprint for how to evaluate new music by asking:
- How many beats per measure?
- (For newer students) How do we beat time?
- What is the pitch of the first note? (Do, re, mi, etc.)
- (Advanced students: hum the first note before the accompanist plays anything)
- What is the duration of the first note? (Whole note, half note, etc.) Beat one may start with a rest.
Progress through the exercises and award points (1, 2, 3) depending on how well students do. The point is not to perfect the exercises, that’s what instrument lessons are for. The point of solfege, week after week, is to introduce students to a new exercise they’ve never seen before and have them learn to quickly break it down and sightread it. Because new students start periodically, and a class may have several small groups assigned a different exercise - that’s where students will get their repetition, since the entire class sings the next number to be assigned for the next week. If students can’t continue until they have perfected an exercise, they might tune out, and this defeats the primary purpose of solfege - learning how to sightread new music.
This will usually take about 30 minutes. Leave the last 15 minutes for individual students to sit at the second piano and do ear training. Because they’re new, start with do, re, mi. Start with middle do, so that they can orient. Students who are not taking piano lessons will need to be shown middle do. Have them figure out do, re, fa. Initially they’ll have a lot of trouble. Prompt by asking did this note go up or down? Discourage them from guessing and slamming random notes. Ask them to listen to the note and think about it before playing the keyboard. Accuracy is more important than speed. New students tend to have more trouble with descending notes, as opposed to ascending, both in terms of solfegiating notes, and ear training. There will be further detailed discussion on ear training later.
Because one student at a time goes up to the second piano, the rest of the class can get unruly, which is understandable. Assistants can keep newer students engaged with quiz questions (can you identify this note?) For the more advanced students, come armed with training games like:
Quiz
Have the advanced students brainstorm three questions to ask the beginner students. They could go to the chalkboard, draw a note, and ask what the note is. Or ask what the duration is, etc.
Which is False?
Advanced students come up with three statements, and beginner students have to figure out which of the three is invalid. Examples: a whole note has 3 beats. Draw middle do on a chalkboard and label it re. Draw an eighth rest and say it’s a quarter rest.
The statements could even be bars of music. Examples: a 4/4 bar with a dotted half note and half note. A 2/4 bar with a whole note.
After a new group has completed three or four solfege classes and is starting to gel - pull the rug out from under their feet. The last class of the month will be their first dictation class.
First Dictation Class
Normal solfege classes are analogous to teaching someone how to drive a car. Learning to write music is analogous to teaching someone how to become an auto mechanic. Learning to read music involves learning about note pitches and durations, rests, etc.
A student trying to figure out a piece of music and write it down must be able to determine how many beats per measure, conduct it, identify if the song starts on the first beat, figure out the pitches, the durations, and where the barlines go. Students learn for a four beat bar, a whole note can fit in that bar, or two half notes, or four quarter notes, or a half note and two quarter notes, or two quarter notes and a half note…
This hacks the brain at a very deep level in terms of understanding music, and ties together everything students started to learn in their regular solfege classes. When the instructor plays a bar of music and the class has to figure out the pitches - that’s ear training. When students have figured out the pitches and have to conduct time to determine the duration of those notes, this reinforces conducting time.
The first thing new students need to learn is how to draw a treble clef.

Draw this on the board and have students draw an entire line of treble clefs, and mark what is correct and what is not. Check after they’ve done three treble clefs, make corrections, then have them continue. Have them do a second line if it’s necessary. For truly young students (age 5 or younger) this is really tough.
Truly young students may be a bit discouraged initially because everyone around them is so much bigger and knows so much more. Maybe older students are already doing fractions in school so some concepts are easier for them. But younger students are getting an earlier start, and that early start is priceless.
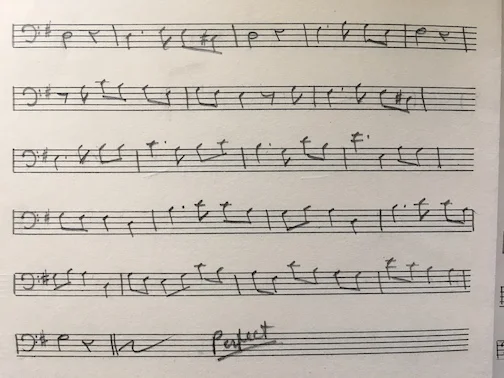
Continuing on, new dictation students must learn to write the time signature, and then notes, starting with middle do. Show them how to write whole notes, half notes, quarter notes, and eighth notes. Repeat writing do a couple times, then re, up to the do one octave up. Then do a couple lines of middle do high do, middle do high do. Then re and high re, up to mi and high mi. Learn to write the rests, and the difference between handwritten quarter rests and eighth rests. This covers the first dictation class.
After the basics, they’re ready to begin to figure out and write down what an instructor plays.
Have students start each new dictation assignment on a new staff, and place their treble clef and time signature. Subsequent lines will need a new treble clef but not the time signature. Show them how to end their exercise with a double bar. Other useful information to include: initials and a date
Students Joining an Existing Class
Throw them in. An infant comes into this world not knowing how to speak, and one day, assuming their hearing works and they are surrounded by speaking adults, they simply begin to speak. All that is necessary is to immerse them in a speaking environment. Solfege works the same way, because from day one students begin creating and understanding music. They will be lost initially, but they’ll have more advanced classmates they can watch. Intersperse new students among the older students so that the older students can correct things like conducting time.
This is also where the assistants are vital - for very young students they can spend the time during the first class giving a new student private instruction on the notes and durations, etc.
Teenage / Adult Students
Set up a separate class where older students are on equal footing age/skill-wise. Adult classes tend to be inconsistent because work schedules may interfere. Instead of going through one exercise a week, individual adult students will randomly choose and go through three exercises a week, meaning the class could sing 10 different exercises or more.
In addition to sightreading training, older students generally have trouble singing on pitch, so going through exercises forcing them to sing acapella is helpful. Watch for the tendency to sing descending notes with too great an interval so that at the end they are flat.
Taking A Step Back
What makes this solfege methodology effective?
Unlike private instrument lessons, solfege is a class. By externalizing everything, students have no place to hide. They know something or they don’t, and it becomes clear to everyone immediately - students, parents and teachers.
- Singing on pitch or off pitch?
- Labeling the notes correctly in solfege form? Is do really do? Or did a student say do when singing re?
- Conducting time correctly? With a class it’s easy to identify someone who is out of sync.
- Two piano ear training accurate or hunting and pecking?
While this can be intimidating initially - having no place to hide - students often discover everyone has different strengths and areas to work on. The student who rises to the top for each of the main categories becomes a high water mark for which other students aspire, pushing the entire class.
The piano accompaniment provides students with a framework. That framework is pretty solid initially, but even by exercise 14 there are sections where students will begin to sing acapella. If students are doing well, let them sing those areas acapella. If they are having trouble singing on-pitch, also play the melody. If students go off pitch, repeat the melody note several times and focus their attention on it. This helps them learn to sing on-pitch over time.
Administrative Considerations
Reminder: Capture contact information for all students.
Consider having parents sign an agreement before classes start, that they will pay a monthly fee for solfege due the first of the month. The fee is paid regardless of whether students attend or not. Set the correct expectations up front.
Initially, while I accompanied the class, and former alumnus Yves Sukhu and Judy Waters assisted, Yves would email a write up each week on each student’s strengths/weaknesses and progress. This was incredibly helpful because in the beginning my brain was spinning so hard as I tried to keep several steps ahead of the class that I missed many of the things he and Judy saw.
Here are some of the things Yves captured in those early classes:
- Name of each student so that we could begin calling them by name, plus their ages
- What kind of musical experience they have (can they read music?), what instrument do they play?
- Was the length of the class appropriate for the number of students?
- Was the breakdown of the class appropriate, e.g. enough time to sing the numbers and do ear training?
- Age ranges - if the range is too great, do we run two 45 minute classes back to back? One for young students, and one for older students / adult students?
New Solfege Instructors
Ideally, solfege instructors should have perfect pitch and be good sight readers. A background in music composition will make music dictation classes that much more effective.
Accompanists should be able to play and sing/teach simultaneously. For those who have never done this, this can be challenging. Another neat skill to learn: play the melody with your left hand while beating time with your right hand, and singing/solfegiating the notes.
Those who compose will learn that they can adapt the accompaniments on-the-fly, which is useful because accompanists can then:
- play something simpler and pay more attention to what is going on with the class.
- incorporate the melody in case a student is having trouble singing on key.
- make the same exercise sound different, so that students aren’t relying on the accompaniment for cues.
Don’t let students strain their voices if the notes go too high. For students who are inexperienced singers, or male students whose voices are changing, tell them they can sing an octave lower if needed, until they get back in range.
Students will stumble right and left. Never stop playing the first time around. Learning how to barrel through mistakes is learning how to be a professional musician. A Juilliard string quartet sightreading compositions for the first time can run into any number of challenges if a composer’s sheet music isn’t crystal clear. Do they stop and say “oh, sorry!” Absolutely not. They barrel through as best they can unless they totally, completely fall apart or the professor stops them. If everyone said “oh, sorry!” every time they made a mistake, everyone would have to stop and regroup. That’s valuable time wasted in a 20 minute reading where performers sightread and play while composers record the performance.
Conduct solfege classes in the same spirit, and only when the exercise is complete, review any challenging areas or concepts. Students will need to learn:
- If they stumble while singing, stop singing but keep following along in the music and pick up
- If they stumble while conducting time, stop conducting and wait for the next first beat
When students are standing, have them place their left hand behind their back. That way the arm isn’t dangling or wiggling around, and it supports better posture when standing. Don’t have them place their left hand behind their back when they are sitting, because they need to hold their solfege book on their laps.